Navigate Report: Student List by Department and Advisor
Step-by-step instructions on creating a report in Navigate, focusing on generating a student list by advisor and department.
Step 1: Logging In
- Start by logging in to Navigate at wcupa.campus.eab.com. Bookmark this page for easy access in the future.
- You can also access Navigate via the Resources dropdown in RamPortal.
- Once logged in, Navigate will take you to your landing page.
Step 2: Accessing Reports
- Click on the Reporting icon (an Excel spreadsheet with a magnifying glass) in the left-hand navigation menu.
- The Reports page will appear, showing two tabs: My Saved Reports and Standard Reports
 .
. - To create a new report, select the Standard Reports tab.
- Scroll through the report types and click on Students Report.
Step 3: Building Your Report
The Students Report allows you to select various data fields to customize your report, including student information, area of study, staff relationships, and more. These data fields are called Filters.
Filter 1: Department
- In the first field, scroll down to the Student Area of Study and choose College (this is where departments are listed).
- The condition will default to "contains any," but you can adjust this by clicking the arrow next to the field to explore other options.
- In the Value field, either start typing a few letters of the department name to narrow the list or scroll down manually. You can add multiple departments.
Filter 2: Advisor
- Click Add Filter to create a new blank field.
- Scroll down to Student Staff Assignment and choose Relationship Type.
- Click on the Value field, and select Advisors. This will display both the major and minor advisors for each student.
- If you only need the minor advisor, scroll down and select Minor Advisor.
Filter 3: Term Credit Hours (this defines your term)
- Click Add Filter, select Student Performance Data, and then choose Term Credit Hours.
- The term will default to the current one, but you can change it if needed.
- Adjust the Condition to "greater than or equal to" and set the Value to 0.
Filter 4: Student Classification (specify which classes you want to be included in the report)
- To narrow the list by classification (e.g., Freshman, Sophomore, Junior, Senior), click Add Filter, scroll down to Student Term Data, and select Classification.
- Set the condition to "contains any" and select the classifications you want in your report.
Step 4: Running the Report
- Once your parameters are set, click Run Report.
- A list of students matching your criteria will appear below the filters.
- Report Options:
- >You can send a message to some or all of the students; by checking off the name, clicking on the Actions button, and scrolling down to Send a Message to Student (you will have an option for email or text).
Step 5: Customizing the Report
Now that your list is created, you can customize the report:

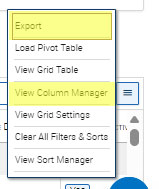
- Customizing the Report - Click the "hamburger button" at the end of the report (right side) and scroll to View Column Manager.
- A list on column headings will appear.
- Uncheck the heading(s) you want to remove from your report.
- Click on the "View Grid Settings" or "Run Report" again to see the changes.
- Oops - need to add in another data column! You can add in any deleted columns, by clicking on "View Column Manager" and check-off the columns you want to add to your report.
- Use the Save As button to update any changes. - Export the Report:
- Click the "hamburger button" at the end of the report (right side) and scroll to Export.
- Choose the file type for your export
- Save the Report:
- To refer to this report later, click Save As in the upper-right corner.
- Naming the Report: Use the semester and key filters as part of the name, such as "FA24 Mkt/Mgt Advisors-FR, SO, JR, SR."
- After saving, a success message will appear in the upper-right corner.
- The report will be saved under the My Saved Reports tab for future access.
- When you click on the saved report later, it will display updated data.
- To refer to this report later, click Save As in the upper-right corner.
Additional Information regarding Advisor Assignments for Navigate vs. Ram Portal can be found in the ITS Knowledgebase at https://wcupaprod.service-now.com/aes?id=kb_article_view&sysparm_article=KB0011837
Additional Benefit: You Can Schedule Saved Reports
You can schedule reports to run automatically on a preset schedule. This feature is helpful for those who need reports to run daily, weekly, or monthly.
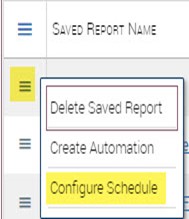
- In the My Saved Reports List, click on the hamburger menu next to the report name and choose Configure Schedule.

- Select your schedule duration (e.g., until the end of the semester) and frequency (daily, weekly, monthly).
- Define your specific frequency options (e.g., every Monday).
- Choose a time for the report to be delivered to your WCU inbox.
- Click Save Schedule Report Rule.
