
Creating a Student List For Accelerated Programs Using an Advisor's Name
If your department assigned specific faculty advisors to the students in your accelerated program, you could create a list of all students in your accelerated programs in Navigate.
Getting Started:
- Login to Navigate
- Click on Reporting Icon

- Click on Standard Reports Tab
- Scroll down and click on Students Report.
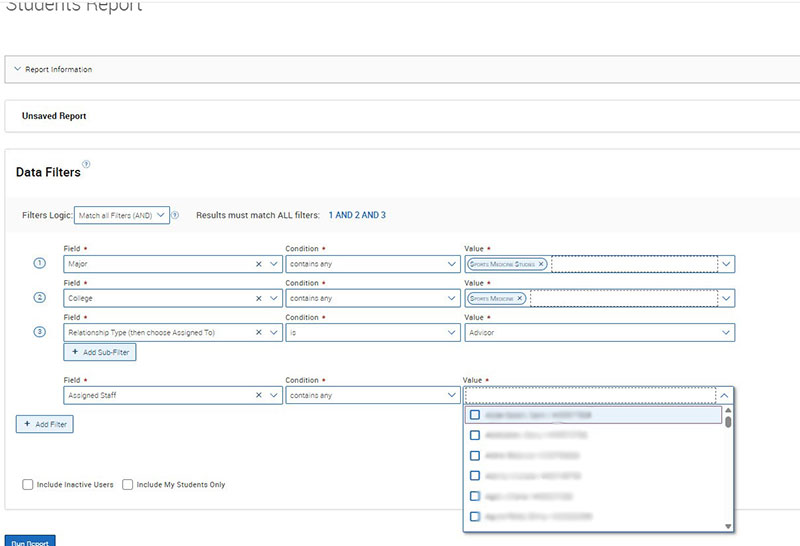
Setting Up Report Filters
- Filter 1: Major
- In the filter field, type or search for Major.
- Set the condition to Contains any.
- Select the relevant major(s) associated with your accelerated program.
- Filter 2: College
- Add a new filter.
- Type or search for College.
- Set the condition to Contains any.
- Select your department or college name.
- Filter 3: Relationship Type
- Add another filter.
- Type or search for Relationship Type.
- Set the condition to Is.
- Select Advisor.
- Sub-Filter: Assigned Staff (Optional)
- Click Add Sub Filter under the Relationship Type filter.
- Choose Assigned Staff.
- Set the condition to Contains any.
- Select the names of the faculty advisors.
- To narrow down to specific advisors:
Run the Report
- Check your parameters and then click Run Report.
- Wait a few moments while the system processes your request.
Running the Report
- Review your selected filters to ensure accuracy.
- Click Run Report.
- Wait a few moments for the system to process and display the results.
Reviewing the Report
- Once generated, the report will display a list of students matching your criteria.
- Review the list to confirm it includes the intended students.
- If necessary, adjust the filters and rerun the report.
Exporting Report (Optional)
- To export the data:

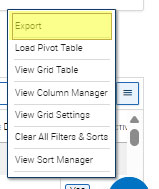
- Click the "hamburger button" at the end of the report (right side) and scroll to Export.
- Choose the file type for your export
Saving the Report (Optional)
- To save the report for future use:
- Click Save As at the top of the page.
- Provide a descriptive name, e.g., "Fall 2025 Accelerated Program Students by Advisor".
- Access saved reports later under the My Saved Reports section in the Reporting tab.
Scheduling the Report (Optional)
- To schedule regular reports:
- Select the saved report.
- Scroll to Configure Schedule.
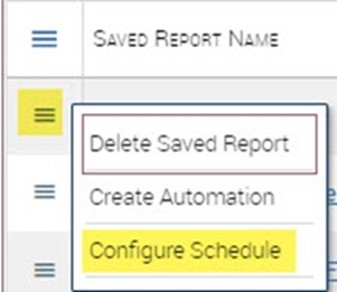
- Set the desired frequency (daily, weekly, monthly), start/end dates, and time.
- Save the schedule. Navigate will automatically generate and send the report to your WCU Inbox at the specified intervals.