
Creating a Student List by Course
By following these steps, you can easily gather information on students who are enrolled in course(s) using the Student Enrollment Reports functionality in Navigate.
Step 1: Log into Navigate
- Open your web browser and go to your WCU’s Navigate portal.
- Enter your WCU login credentials to access the system.
Step 2: Access the Reporting Section
- Once logged in, navigate to the left-hand side of the dashboard and click on the Reporting tab
 .
. - Under this tab, select the Standard Reports tab to access the reports page.
Step 3: Select Report Type
- On the Standard Reports page, you’ll see a list of available report options. Choose Students Enrollments Report.
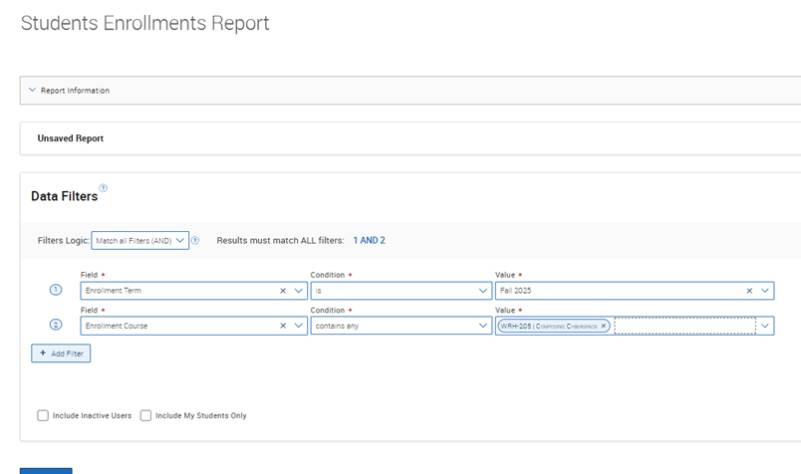
Step 4: Apply Filters
- Using the Students Enrollment Report:
- First filter set Fields as the Enrollment Term, Condition = is, Value = Type in term
- Second Filter set fields as > Enrollment Course> Condition=contains any, Value = type course initials, then check off course
Step 5: Review Filters
- Double-check your selected filters to make sure you have accurately defined your department, major, minor, and any other relevant data points.
- Ensure you’ve selected the correct academic term or date range, if applicable.
Step 6: Run the Report
- Once you’ve applied all the necessary filters, click the Run Report button to generate the list of students.
- Wait a few moments while the system processes your request.
Step 7: Review the Report
- Once the report is generated, review the list of students. You will see their names and the information based on the filters you applied.
- If needed, adjust the filters by returning to the report setup and modifying any criteria.
Step 8: Export the Report (Optional)
- If you need to share the report or analyze it further, you can export the data.

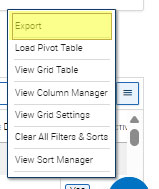
- Click the "hamburger button" at the end of the report (right side) and scroll to Export.
- The Export file will be a CSV.
Step 9: Save the Report (Optional)
- If you will need this report in the future, click Save As at the top of the page.
- Provide a descriptive name for the report, such as "Majors and Minors in [Department] – [Term]" to make it easy to find later.
- Saved reports can be accessed under the Saved Reports section in the Reporting tab.
Step 10: Schedule a Report (Optional)
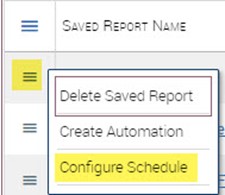
- If you need this report to run regularly, you can schedule it by selecting the report
and scrolling to Configure Schedule.
- Set the frequency (e.g., daily, weekly, monthly), start/end date, and time.
- Save the schedule and Navigate will automatically generate and send the report to your WCU Inbox at your chosen intervals.